
If you’re looking for cute new crafts to try in your DIY era, air-dry clay might be your new best friend.
To begin your crafty creations, we recommend purchasing an air-dry clay kit from a local craft store and grabbing utensils (think: wooden dowels and an X-acto knife) to help carve or mold your clay to your desired shape. To get creative with these ideas below, we also recommend your favorite acrylic paint or paint markers to make your creations colorful, crafty and 100% your vibe. Cue the crafts, please…
Jewelry dishes
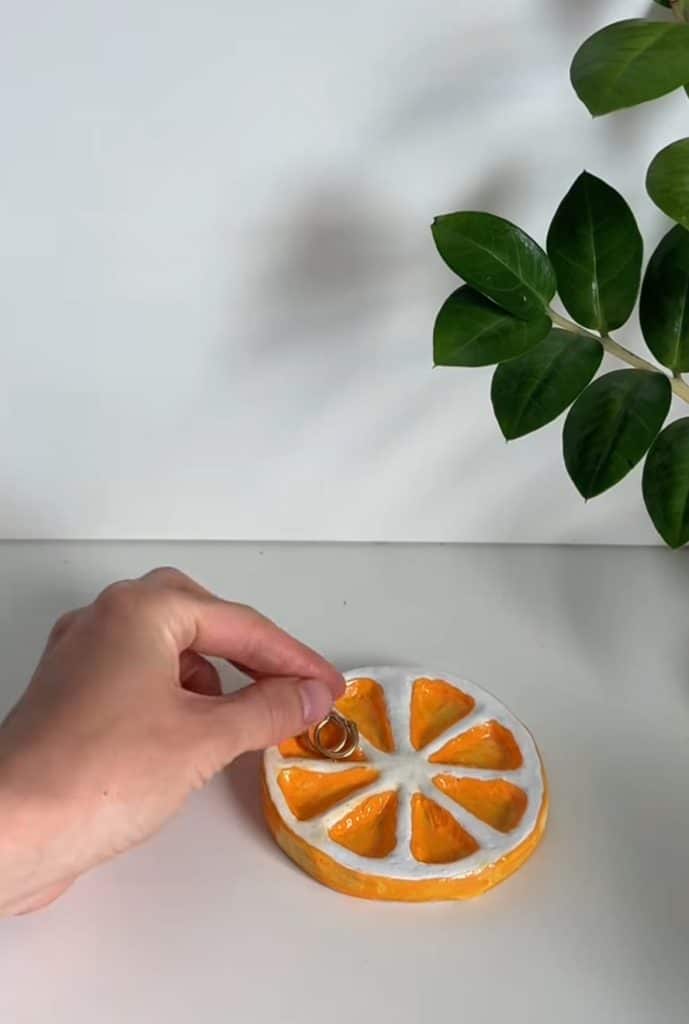
Looking for a cute way to display your jewelry? Try making a jewelry dish! Jewelry dishes can be any shape (like hearts, flowers or simple circles), and they’re super easy to make.
Separate a small section of clay and roll it out flat on a clean, dry surface. As you flatten your clay, make sure not to roll it out too thin. Once your clay is flat, carefully use a clay carving tool, a knife or a cookie cutter to cut out your desired shape.
Once you have your desired shape, you can begin to carve out the center of your dish to build the walls. When carving out your dish, make sure not to cut too deeply! If you carve too deeply, you might accidentally cut through the bottom.
As you carve, leave some clay around the edges of your tray for the walls. If you don’t feel comfortable carving, DW—you can press your piece flat with your fingers.
After you have your tray carved out, you can go over it with a damp sponge or cloth to clean it up and flatten out any bumps. After that, you can bake your clay according to the instructions on your package. Once your tray has been baked, give it some time to cool, and then you can start painting!
Photo stands
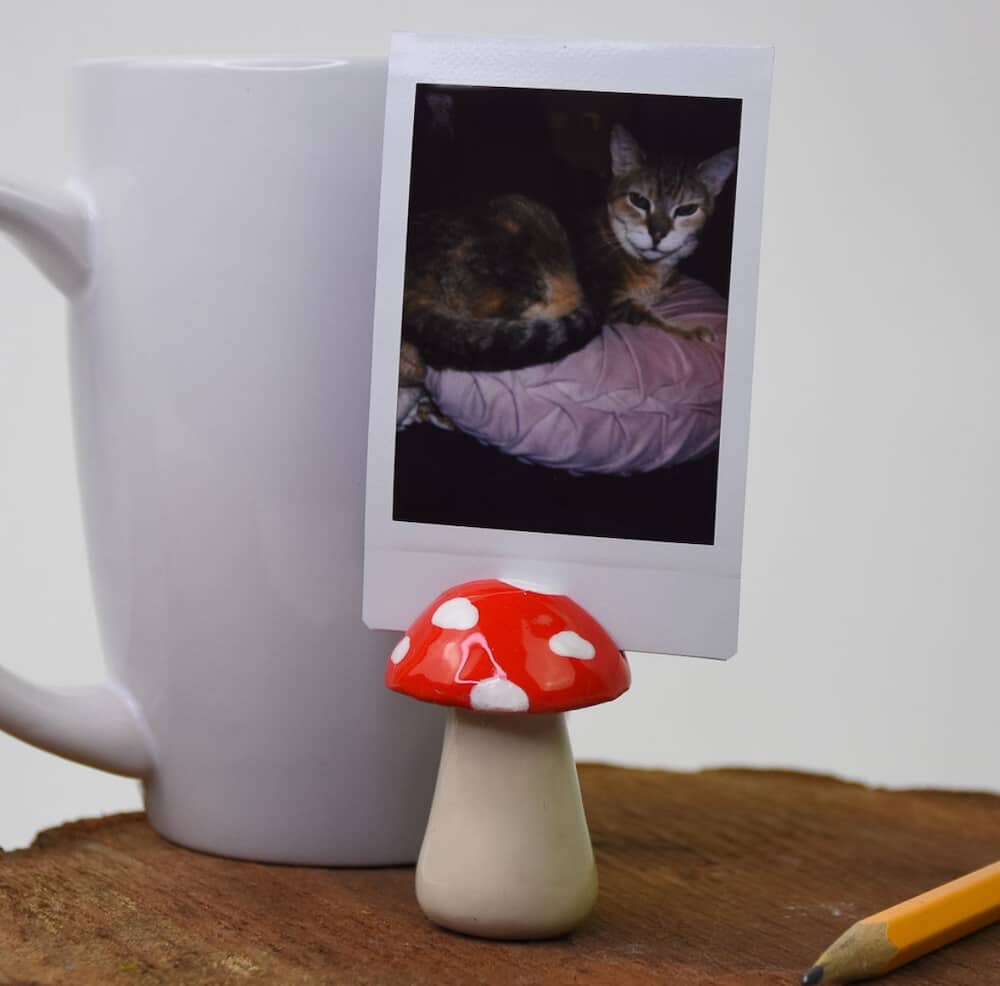
A perfect alternative to your basic picture frame, air-dry photo stands are great for displaying polaroids or full-size prints.
When picking your shape, make sure to choose something that isn’t too top-heavy, since you want the piece to stand on its own. If the shape you’re making has multiple parts (like the pic above), you can practice slipping and scoring to help stick your pieces together. Slipping and scoring is when you cut small slashes into the edges of two clay pieces (scoring) and use wet clay (slip) on those rough edges to piece them together.
Once your photo stand is assembled, measure out the slit for your picture to sit in. This can be done using a clay carving tool, a knife or a small item you may have in your house—like a paperclip or a bobby pin. Carefully carve or press a deep line into your photo stand. Use the picture you want to display for reference on how big the time should be.
After you’ve carved into your shape, you can clean up your clay with a damp towel or sponge, then bake it.
Trinket shelf
While this craft might be a little more advanced, the payoff is so worth it. These little trinket shelves can be hung in your room and are perfect for displaying your little trinkets or collections. Your Sonny Angels, tea lights and crystal collection can live on these tiny shelves, and they add just the right amount of whimsy.
Start by making the shape for the back of your shelf. Take a chunk of clay and roll it out flat on a smooth, dry surface. Once your clay is rolled out, measure out your shape and begin cutting with a knife or a clay carving tool. You’ll also want to cut a small hole into the top of your shape so you can hang it up. Once you have your shape cut out, you can smooth it out with a damp sponge or towel.
For the ledge of your shelf, you’ll want to repeat these same steps. Make sure to measure your pieces of clay to make sure they fit well together. Once your clay pieces are cut out, connect your shelf ledge to your shelf backing by slipping and scoring your pieces.
Now that your clay pieces are connected, carefully transfer your shelf onto a baking tray, and bake your piece according to your packaging. Once your tray has baked and cooled, you can paint your shelf and run a string through the hole you’ve carved into the top. Now you’re ready to display your fave trinkets!
Tried one of these DIYs? Tag us on IG @girlslifemag and show off your cute new creations!
Want more craft ideas? Check these out:
🎨 Make your playlists last forever by burning CDs
🖍️ Paper Portraits are officially our new fave boredom buster
🖼️ Make a BTS scrapbook that’s totally *you*
Top image: @claymi.co Slider image: @eggiestudio.co
Body images: @sculpdit, @sculpey_official, @pottdpeople